
New to Polymer Clay... Beginners Guide

Hi folks,
Good to see you on my beginners guide page. This is where I will tell all you lovely people what you need to know about this wonderful modelling material, well some of it anyway!! There is a lot to fit in, but I will chat about the main things you need to know... such as:
-
What is Polymer Clay?
-
What tools and equipment you need to get started
-
Conditioning the Clay
-
Colour Mixing - includes videos and worksheet
-
Textures and Patterns
-
Mini guide to Millefiore 'canes'
-
Baking and finishing off
-
More great websites to visit for much more help!!
1. What is Polymer Clay...
Polymer Clay is a highly coloured modelling material, that, once your desired shape is formed, it is then'baked' in an ordinary home oven. This process permanently hardens the clay. The clay doesn't shrink, it stays the same colour, it is waterproof and non toxic.
For a more technical explanation about this clay follow this link:http://en.wikipedia.org/wiki/Polymer_clay
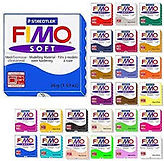
There are several brands of clay, the most popular and readily available in the UK is Fimo. This brand of clay was the founding brand and has been aroung for over 50 years. It has changed over the years, and has several catagories...
-
Fimo Soft - this is a popular soft clay that is easy to use and shape.
-
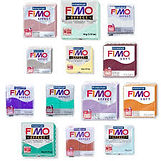
Fimo Professional - this clay is a firmer clay, and comes in a larger pack and has a different range of colours.
-
Fimo Kids - this comes in smaller blocks than the soft, it is great for young children under the age of 5. It is also good for those who struggle with arthritis or for people who have dexterity problems
-
Fimo Effects - this is the same consistency as Fimo soft but it comes in metallic, transluscent, pastel, faux pearl, glow-in-the-dark, granite stone and pearlised colours.
-
Fimo Leather - this is a new clay from Fimo, it has a textured appearance and feels like leather. It also stays slightly bendable after baking.
They all bake at the same temperature and can be mixed together like paint to make an infinite colour palette.


There are other brands of Polymer Clay, that are available:
-
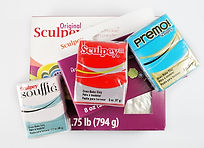
Sculpey III - this is a great clay for children, it is very soft and has a lovely soft texture.. It is not very hard wearing, so small models can break.
-
Super Sculpey - a professional sculpting clay that comes in a peach skin colour
-
Sculpey Living Doll Clay - professional clay for those who make and sculpt dolls
-
Sculpey Souffle - this clay has a matt, velvety texture. Doesn't mix very well with other clays.
-
Sculpey Premo - this is a profession brand of clay which is hard wearing and comes in a beautiful range of colours.
-
Sculpey Eraser Clay - this clay, once it is baked makes erasers/pencil rubbers. It comes in a neon palette.
-
Kato Polyclay - This is quite a firm clay and is said to be the strongest once it is baked.
https://www.jessamatutorials.com/kato-polymer-clay.html this website will give you more information about this wonderful clay.
-
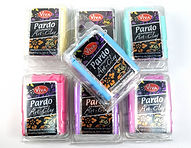
Cernit - This has a great range of metallic colours.Pardo Art Clay - this is quite a fim clay and is crumbly when conditioning. The transluscent clay is very good.
Click on the images for more info about the clays


2. Tools and Equipment to get you started...
If you are a complete beginner, there are some items that you need and some that can wait a while. There are a lot of things that you may already in your house or kitchen. It is better to have designated tools for clay only so to avoid any cross-contamination with food stuffs.
-
Baby wipes - These are essential for cleaning your hands in between colours. Some colours will stain your hands so to avoid comtaminating the paler colours, you'll need to keep your hands clean. These don't have to be expensive type...poundshop ones will suffice.
-
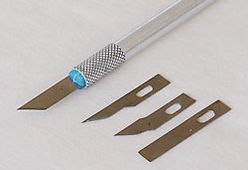
Scalpel/Craft Knife. This is a necessary piece of kit. You can pick them up relatively cheaply from craft suppliers and Ebay. Be very careful when using new sharp tools, it is very easy to cut yourself...sadly, I speak from experience!!
-
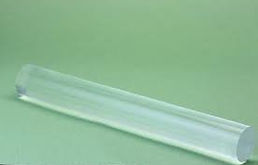
Rolling pin - The best ones are made of acrylic. Wooden ones are not really suitable as the clay can stick to the surface and also the wood will make marks on the clay. An old glass bottle can be a great substitute or even an old metallic pen barrel. You can get acrylic rolling pins that are great or ask a plumber friend for some off cuts off plastic pipes.

-
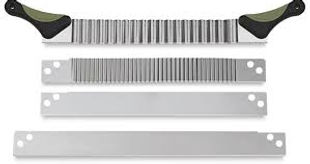
Blade - This is a flat 6" thin blade which is great for cutting very thin slices of clay, and for cutting straight lines, but also great for lifting your item up off your working surface. They are extremely sharp, so please be careful!! (Not suitable for children!) This is an essential item to buy if you are going to make Millefiore canes.
-
Cocktail Sticks - These are very useful for details, mark making and texturising the clay, as well as for making holes in beads.
-
Ceramic tile - This is great for making your creations on as it can be put straight in the oven, without moving your art work. The tile is nice and smooth so you are not going to get any marks on the clay and it is also cool in the summer. It is essential that you get a glossy tile, so the clay doesn't discolour and leach out into the absorbent matt surface. You can pick up tiles very cheaply from a DIY store or a friendly neighbour who has some left over from tiling their bathroom!! I actually got some on Trash Nothing - the free give away site. Saves them going to landfill!!

-
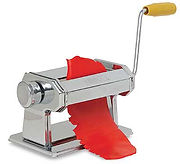
Pasta Machine (optional, but will be really useful!) This is used for conditioning/softening the clay, and also for making flat sheets of varying thicknesses and also there are several blending techniques that you can only really do with this gadget! These have come down in price recently and in the Uk you can pick one up from Argos for just over £20.00. One of the best pasta machines to buy is an Atlas 180...these will set you back about £80 but apparently they are worth every penny. I'm saving up!!
-
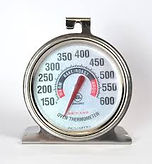
Oven thermometer - this is often a piece of equipment that is missed out, but is essential. I find that the temperature gauge on your home oven is not to be totally trusted, so to double check a cheap thermometer is a great buy.
3. Conditioning the Clay...
I am going to first chat about conditioning the clay. All this means is that you need the clay to be nice and soft so that it is easy to work with and doesn't crumble up in your hands. When I first started working with Fimo, it was quite a firm clay and took ages to soften it, but the recipe was changed several years ago which means it is so much better to condition.
-
Take a piece of clay and start by rolling and folding it in your hands. Do this several times until the clay is soft and pliable.
-
If it is very crumbly, you can put it on a warm hot water bottle or heat pad, this has got to be just warm, if it is any hotter, the curing process can start.
-
Some people add a few drops of mineral oil or baby oil, but I haven't yet tried this method.
-
Fimo has a product called Mix Quick, which is a specific clay softener. This a whitish clay which you mix together. It does help to get the clay working together and to soften it.
-
Some folks will put it into a small zip lock bag and then sit on it or have it in their pocket. I do know some ladies who put it in their bras...it works, but remember to take it out before you venture to the shops!!
-
You can mix the clay up in an old coffee grinder. Chop the clay into small pieces, and pulse the clay until it resembles fine breadcrumbs. The friction of the blades will warm up the clay slightly and will make it easier to use. It is a bit messy combining all the tiny pieces and you won't be able to use the grinder for your morning coffee!!
4. Colour Mixing and Marbling ...
When you are completely new to Polymer Clay, having someone to explain the basics can be helpful. Below is a short 10 minute video which explains all about conditioning the clay, which means softening up the clay to it is ready to use, and also about mixing the colours. There is also a worksheet which accompanies it if you prefer to print it out. If you have any other questions, please get in touch via the contact page.
There is also a another video below which shows you what to do with your marbled and mixed pieces.
All the colours can be mixed together to make an infinite colour palette. Quite a few Polymer Clay artists will also mix brands of colours together too, but I would just stick to one brand, as the temperatures and baking times are very different from each other. Mixing the colours is such a cool way to achieve some amazing patterns and designs which can be used in a whole host of amazing ways.
5. Textures and Patterns...
There are lots of ways to add texture onto your clay, come is added before it is bakes other can be done after. As a beginner you don't have to buy anything expensive, just look around your home and you will have a great collection of items that will add a bit more interest to your clay. You can also look in charity shops or car book sales for your treasures:
-
In the kitchen you might have a pan scourer which you can push into the clay
-
Scrunched up tin foil makes an interesting pattern
-
A knife or fork that has a patterned handle
-
A glass bottle or jar with an embossed design on the front
-
The end of a pencil or pen
-
A piece of lace or fabric
-
The rib on the sleeve of an old jumper
-
The bark of a tree
-
Leaf or flower prints
-
Tread of a shoe
Once you start looking you will be amazed at what you can find...
6. Mini Guide to Millefiore Canes...
This technique has been 'borrowed' from the Venetian glass makers, but instead of glass rods put together to make intricate patters, we use the clay. What you are aiming for is a tube of clay with a picture, lettering or another design on the end of the tube, a bit like sushi when you slice into it, or a stick of sea side rock. Where ever you slice the tube the pattern is always going to be the same. There are a myriad of ways to use canes, you can make the most gorgeous jewellery, cover boxes or picture frames, or even cover pens or crochet hooks.
Below are some images of simple canes and also some to inspire you to keep up the practise...me included!!
Why not pop over to my shop and have a look at some of my 'caned' jewellery...
Here are two beginner tutorials for you to have a look at...
https://www.jessamatutorials.com/basic-bulls-eye-cane.html
https://www.jessamatutorials.com/jellyroll-cane.html


-
All Polymer Clay is oven hardening, but the different brands of clay each have their own specific baking times and temperatures, so do check the packets labelling and with the advice they give on their websites.
-
The general rule of thumb for Fimo modelling clay is 110 degrees C for 30 mins, that's what Staedtler, the manufacturers, suggest! I have found that Fimo can be baked in the oven for a lot longer, just so long as the oven stays at a constant temperature. Always use a separate oven thermometer. I have left pieces in the oven for an hour and a half and it has been ok. With the translucent clay, it is often better to 'tent' your project. This means that you cover it with some tin foil or a foil tray, this will protect the clay from discolouring
-
If you are working on a ceramic tile, simply put the tile along with your piece in the oven and bake for the recommended time. The tile won't break and it saves you moving your design. The tile is also very good because it is smooth (Blades won't damage the surface)smooth, its cool (which is good in the summer!!) and very hard wearing, and also cheap to buy.
-
You can also bake on a baking tray lined with tin foil. Some people bake their jewellery items on a piece of copy paper... this may seem strange but it means that your jewellery won't have a flat, shiny spot where it has stuck onto the tin foil. The paper or card won't burn, because the temperature is low.
-
Once your item is baked, leave to cool completely, don't be tempted to move it as it will break. It isn't completely cured until it is fully cold. To speed up the process a bit you can plunge the item into very cold water, so long as it is not covering a glass or ceramic vessel... this will cause the glass to shatter!
-
The item is now complete. It is already waterproof, so can be placed outside if you wish, it doesn't need varnishing.
-
If you want to go a step further, especially with your jewellery piece, you can sand the edges to give a perfect professional finish. This is done with wet and dry sandpaper, the type that is used when repairing car body work. You have to sand the edges in water. You can also sand the whole piece if you wish, starting with a low grade paper such as 500, then moving up incrementally to 2000. this will give your jewellery an unbelievable smooth and shiny surface. It can take a while, so you'll need plenty of patience!!
-
Another way to finish off your jewellery can be with a varnish. I tend to stick with Fimo varnish as some others, such as nail polish, can react with the clay and they don't dry and will stay sticky.You can also coat the piece with resin. The one I use is by Pebeo and it's called Crystal Resin. It is a two part resin that gives a really nice domed shiny finish, but it can take 48 hours to set completely, but it is well worth the wait.
7. Baking and Finishing off...
8. Great Web Sites...
https://thebluebottletree.com/
This is a wonderful treasure trove of advice for everyone involved with Polymer clay, either complete beginner or seasoned expert. There is always something to learn from Ginger!!
https://www.youtube.com/channel/UCHnfmkZSQzXUcy71-VPtMlQ
I have learned a lot from Cindy Leitz and her great Polymer Clay Tutor videos.
I am a member of the British Polymer Clay Guild in the UK. This is a great organisation that can help you with your PC questions, they even have lists of workshops or local groups that you can go to, to brush up on your skills and meet other enthusiasts in your area.
http://www.polymerclaycentral.com/
This is my go to website when I am in need of a tutorial. They always have what you're looking for and have some amazing inspiring projects to try for all levels of ability.
https://www.pinterest.co.uk/staedtlermars/myfimo/
This Pinterest board that I follow has some great inspiring ideas on it... Why not have a look?
https://www.pinterest.co.uk/gillcosford/polymer-clay-inspirations/
This is my Pinterest Board that I have collated over the years. There are some amazing artists work there which may inspire you to give it a go..
This is a UK based company for all your PC supplies, equipment and a whole host of other things you didn't realise that you need.